Rate Limiting (Bot Detection)
Keep your website performing optimally and protect it from abusive traffic with iGelGiz’s Rate Limiting feature. This powerful tool, also known as Bot Detection, helps prevent your site from being overwhelmed by too many requests from a single IP address in a short period, which is often a sign of malicious bots or denial-of-service attempts.
Accessing Rate Limiting Settings
In your WordPress admin dashboard, navigate to iGelGiz.
Click on the Rate Limiting tab.
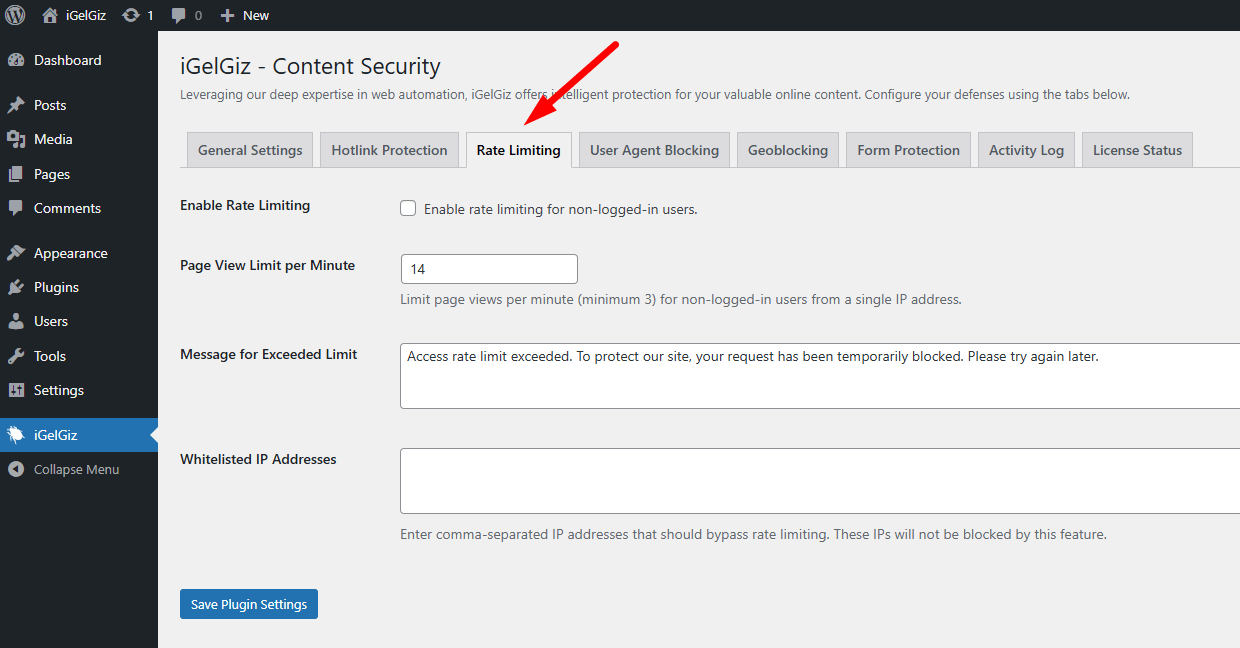
Available Options
Enable Rate Limiting
What it does: When active, this feature monitors the number of page views from individual IP addresses (for non-logged-in users). If an IP exceeds the defined limit within a minute, further access from that IP is temporarily blocked.
Configuration: * Check the box labeled: “Enable rate limiting for non-logged-in users.”
Why it’s great for you: * Prevents Site Overload: Stops aggressive bots or attackers from overwhelming your server. * Enhances Stability: Keeps your site responsive and available for legitimate visitors. * Blocks Bad Bots: Deters scrapers and other malicious bots that make rapid, repeated requests.
Page View Limit per Minute
What it does: Sets the maximum number of page views a single IP address (for non-logged-in users) is allowed to make within a one-minute timeframe before being temporarily blocked.
Configuration: * Enter a number in the field labeled “Page View Limit per Minute.” The minimum allowed value is 3. * A sensible default is provided, but you can adjust it based on your site’s traffic patterns.
Why it’s great for you: * Customizable Threshold: Tailor the limit to your site’s specific needs. A lower limit is more aggressive, while a higher limit is more lenient. * Balances Security and Accessibility: Helps block abuse without unduly affecting normal user behavior.
Message for Exceeded Limit
What it does: Allows you to define the message displayed to users (or bots) whose IP addresses are temporarily blocked due to exceeding the rate limit.
Configuration: * Enter your custom message in the text area labeled “Message for Exceeded Limit.” * A polite and informative default message is provided.
Why it’s great for you: * User Communication: Informs the visitor why their access is restricted, which can be helpful if a legitimate user is inadvertently (though rarely) affected. * Professionalism: Maintains a professional appearance even when enforcing security measures.
Whitelisted IP Addresses
What it does: This crucial setting allows you to specify IP addresses that should never be blocked by the Rate Limiting feature, regardless of their request frequency.
Configuration: * Enter IP addresses, separated by commas, into the text area labeled “Whitelisted IP Addresses.”
Why it’s great for you: * Ensures Access for Critical Services: You can whitelist your own IP address, IP addresses of trusted services (like uptime monitors or specific APIs), or partner IP addresses. * Prevents Self-Lockout: Avoid accidentally blocking yourself during testing or high-activity periods. * Flexibility: Allows known, high-frequency legitimate traffic to pass through unhindered.
Saving Settings
After configuring these options, remember to click the “Save Plugin Settings” button at the bottom of the page.
With Rate Limiting, you’re adding a vital layer of defense that ensures your website remains a welcoming place for genuine users by intelligently managing traffic and deflecting potential threats. Enjoy a smoother, more stable website experience!